How-To
Home Assistant Backup and Recovery Best Practices 2026
Explore Home Assistant backup and disaster recovery best practices for 2026, focusing on privacy, offline reliability, and cost-efficiency.
Quick answer:
Executive Summary
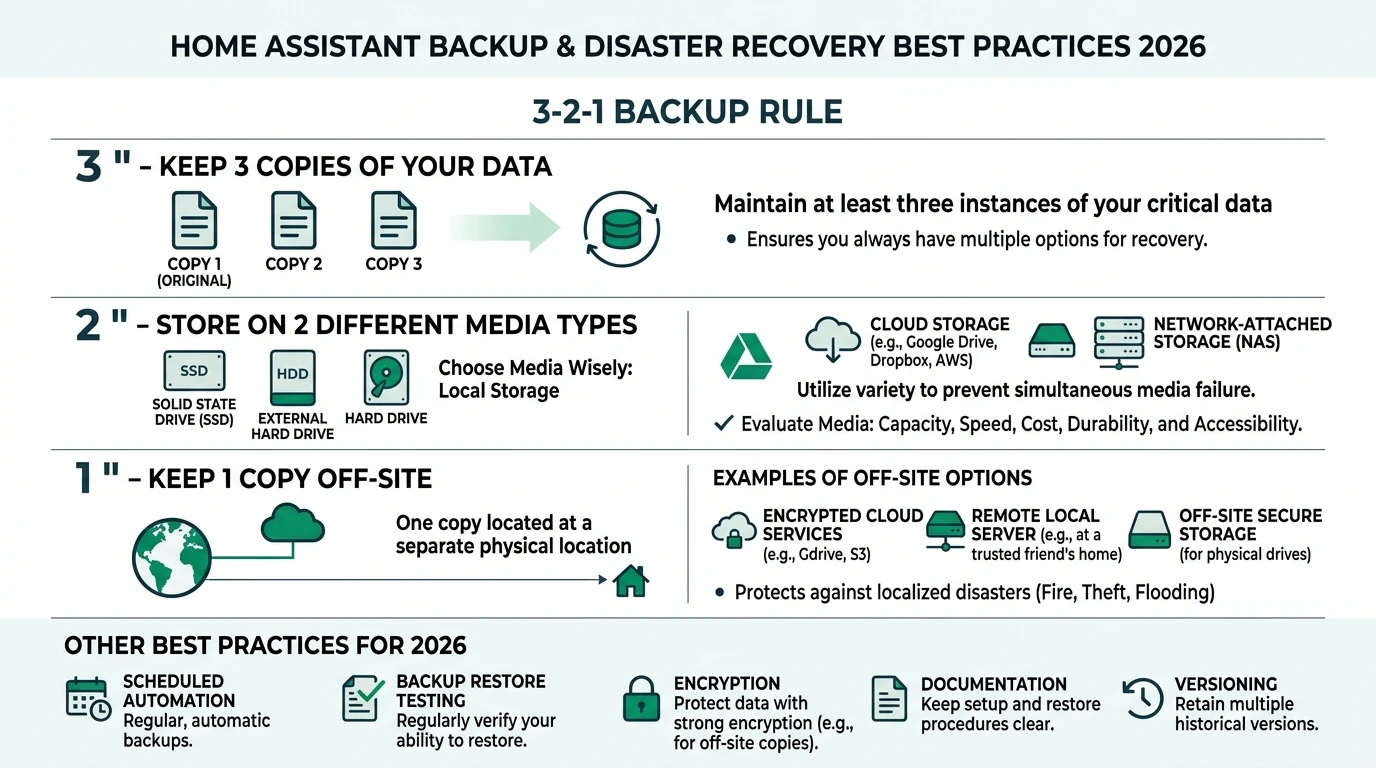
In 2026, safeguarding your Home Assistant setup involves a strategic approach to backup and disaster recovery. The emphasis is on maintaining control over your data, ensuring offline reliability, and minimizing costs. The 3-2-1 backup rule remains a cornerstone: keep three copies of your data on two different media, with one copy stored off-site. This strategy protects against hardware failures, power surges, and natural disasters.
Local solutions like NAS (Network Attached Storage) are preferred for their privacy benefits and offline capabilities. They eliminate cloud dependencies, which can pose privacy risks and require constant internet access. Testing your backup system quarterly ensures that you can recover quickly from any data loss incident.
The bottom line: Prioritize local, encrypted backups with regular testing to ensure your smart home remains resilient and secure.
Understanding the 3-2-1 Backup Rule
The 3-2-1 backup rule is a widely recognized strategy for ensuring data resilience. It involves maintaining three copies of your data: the original and two backups. These backups should be stored on two different types of media to mitigate the risk of hardware failure. Finally, one copy should be kept off-site to protect against local disasters such as fires or floods.
For Home Assistant users, implementing this rule can be straightforward yet highly effective. Start by creating automated backups using Home Assistant’s built-in tools. The 2025.1 release introduced a wizard that simplifies this process, allowing you to schedule nightly backups and manage retention policies with just a few clicks. This ensures that you always have recent copies of your data available.
Choosing the right storage media is crucial. A combination of local NAS and external drives can provide the necessary redundancy. NAS devices are particularly advantageous because they offer large storage capacities and can be configured for automatic backups. Additionally, they support encryption, ensuring that your data remains secure even if the device is compromised.
Off-site storage can be achieved by manually transferring backups to a secure location or using a cloud service with strong encryption and privacy controls. While cloud services offer convenience, they should be used cautiously due to potential privacy concerns. Always encrypt your data before uploading it to the cloud to maintain control over your information.
Local vs. Cloud Backup: Privacy and Cost Considerations
When deciding between local and cloud backup solutions, privacy and cost are key factors to consider. Local backups, such as those stored on a NAS, offer unparalleled privacy. Your data remains within your control, and there’s no risk of third-party access. This is particularly important for Home Assistant users who prioritize privacy and offline reliability.
NAS devices, while requiring an initial investment, can be cost-effective in the long run. A typical NAS setup might cost between $200 and $500, but it eliminates ongoing subscription fees associated with cloud services. Additionally, NAS devices can be configured to operate offline, providing access to your data even during internet outages.
Cloud backups, on the other hand, offer convenience and scalability. Services like Cloudflare R2 provide free tiers that can accommodate small backup sizes, but costs can increase as your data grows. Privacy is a concern with cloud solutions, as data is stored on third-party servers. To mitigate this, use services that support encryption and allow you to manage your own encryption keys.
The table below compares local NAS and cloud backup options based on privacy, offline reliability, and total cost of ownership (TCO):
| Criterion | Local NAS/Network Share | S3-Compatible (e.g., Cloudflare R2) | HA Cloud |
|---|---|---|---|
| Privacy/Local Control | High (no vendor access) | Medium (self-hosted keys) | Low (Nabu Casa access) |
| Offline Reliability | Excellent (air-gapped option) | Poor (requires internet) | Poor (internet-dependent) |
| TCO (1-year, 95MB x 30 backups) | Low (~$0 after $300 NAS) | Low ($0-5/month free tier) | Medium ($6.50/month sub) |
Local solutions clearly offer superior privacy and offline reliability, making them ideal for users who value control over their data. However, cloud solutions can be a viable option for those who prioritize convenience and are willing to manage the associated privacy risks.
Implementing Encrypted Backups in Home Assistant
Encryption is a critical component of any backup strategy, ensuring that your data remains secure from unauthorized access. Home Assistant supports encrypted backups by default, using password-protected .tar files. This feature is accessible via the Settings > System > Backups menu, where you can configure your backup preferences.
To implement encrypted backups, start by setting a strong password that only you know. This password will be required to restore your data, so it’s essential to keep it secure. The 2025.1 update introduced a wizard that guides you through the process of setting up automated, encrypted backups. This wizard simplifies the configuration, allowing you to focus on other aspects of your smart home setup.
Testing your backups is equally important. Schedule quarterly restore tests to verify that your backups are functional and that you can recover your data in an emergency. This practice not only ensures the integrity of your backups but also familiarizes you with the restoration process, reducing downtime in the event of a failure.
For those using cloud services, ensure that your data is encrypted before uploading it. Use services that support client-side encryption, allowing you to manage your own encryption keys. This approach provides an additional layer of security, protecting your data from potential breaches or unauthorized access by service providers.
Setting Up a NAS for Home Assistant Backups
A Network Attached Storage (NAS) device is an excellent choice for Home Assistant users seeking a reliable and private backup solution. NAS devices offer large storage capacities, support for automated backups, and the ability to operate offline, making them ideal for privacy-conscious users.
To set up a NAS for Home Assistant backups, begin by selecting a device that meets your storage needs. Consider factors such as storage capacity, number of drive bays, and support for RAID configurations, which provide redundancy in case of drive failure. Popular NAS brands include Synology and QNAP, both of which offer user-friendly interfaces and robust feature sets.
Once your NAS is set up, configure it to receive backups from Home Assistant. This can be done using the built-in backup tools in Home Assistant, which allow you to schedule regular backups and manage retention policies. The 2025.1 wizard simplifies this process, enabling you to set up nightly backups with minimal effort.
To enhance security, enable encryption on your NAS. Most NAS devices support encryption, allowing you to protect your data from unauthorized access. Additionally, consider setting up a VPN to secure remote access to your NAS, ensuring that your data remains private even when accessed from outside your home network.
Finally, implement the 3-2-1 backup rule by manually transferring backups to an off-site location. This could be an external hard drive stored at a friend’s house or a secure cloud service. Regularly update this off-site backup to ensure that you have a recent copy of your data in case of a local disaster.
Testing and Maintaining Your Backup System
Regular testing and maintenance are essential to ensure that your backup system remains effective and reliable. Without testing, you may not discover issues with your backups until it’s too late, leading to potential data loss and extended downtime.
Begin by scheduling quarterly restore tests. These tests involve restoring your backups to a virtual machine or a separate environment to verify their integrity. This practice not only confirms that your backups are functional but also familiarizes you with the restoration process, reducing stress during an actual recovery scenario.
During testing, pay attention to the time it takes to restore your data. This information is crucial for planning your recovery strategy, as it helps you estimate the downtime you might experience in a real-world scenario. If restore times are longer than expected, consider optimizing your backup process or upgrading your storage hardware.
In addition to testing, regularly review your backup settings and retention policies. Ensure that your backups are scheduled at appropriate intervals and that you are retaining enough copies to meet your recovery needs. Adjust these settings as your data grows or your requirements change.
Finally, stay informed about updates and best practices for Home Assistant backups. The 2025.1 release introduced several enhancements, and future updates may offer additional features or improvements. Regularly check the official Home Assistant blog and documentation for the latest information.
Privacy and Security Implications
Privacy and security are paramount when managing backups for your Home Assistant setup. Ensuring that your data remains confidential and protected from unauthorized access is crucial, especially given the sensitive nature of smart home data.
Local NAS solutions offer the highest level of privacy, as your data never leaves your premises. This eliminates the risk of third-party access and ensures that you maintain full control over your information. To enhance security, enable encryption on your NAS and use strong passwords to protect access.
For cloud backups, privacy can be a concern due to the involvement of third-party service providers. To mitigate this risk, choose services that support client-side encryption, allowing you to manage your own encryption keys. This ensures that only you can decrypt your data, even if it is stored on a third-party server.
The table below provides a privacy score comparison for different backup methods:
Regularly review your security settings and update passwords to protect against unauthorized access. Additionally, consider implementing two-factor authentication (2FA) for any accounts associated with your backup system, adding an extra layer of security.
Finally, be aware of potential risks such as ransomware attacks or data breaches. Implementing the 3-2-1 backup rule and using encryption can help protect your data from these threats, ensuring that you can recover quickly and securely in the event of an incident.
Checklist for Home Assistant Backup and Recovery
Implementing a robust backup and recovery strategy for your Home Assistant setup involves several key steps. Use the checklist below to ensure that you have covered all essential aspects:
Checklist
- Set up automated, encrypted backups using Home Assistant's built-in tools.
- Implement the 3-2-1 backup rule: 3 copies, 2 media types, 1 off-site.
- Choose a NAS for local backups to maximize privacy and offline reliability.
- Schedule quarterly restore tests to verify backup integrity.
- Enable encryption on all backups and manage your own encryption keys.
- Regularly review and update backup settings and retention policies.
- Stay informed about updates and best practices for Home Assistant backups.
By following this checklist, you can ensure that your Home Assistant setup remains resilient and secure, protecting your data from loss and minimizing downtime in the event of a disaster.
FAQ
Frequently Asked Questions
What is the 3-2-1 backup rule?
The 3-2-1 backup rule involves keeping three copies of your data on two different types of media, with one copy stored off-site. This strategy enhances data resilience and recovery.
Why should I use a NAS for Home Assistant backups?
A NAS offers privacy, offline reliability, and cost-effectiveness. It allows you to store large amounts of data securely without relying on third-party cloud services.
How often should I test my backups?
It’s recommended to test your backups quarterly. This ensures that your backups are functional and that you can restore your data quickly in an emergency.
Are cloud backups secure?
Cloud backups can be secure if you use services that support client-side encryption and manage your own encryption keys. This ensures that only you can access your data.
What are the costs associated with NAS backups?
NAS devices require an initial investment, typically between $200 and $500. However, they eliminate ongoing subscription fees and offer long-term cost savings.
Primary Sources Table
| ID | Title/Description | Direct URL |
|---|---|---|
| 1 | Home Assistant: The Ultimate Backup Guide (3-2-1 rule, NAS/Google Drive) | Link |
| 2 | Safeguarding Home Assistant Part 2 (S3 integration, 2025.1 updates) | Link |
| 3 | Common tasks - Home Assistant (Backups overview) | Link |
| 4 | 3…2…1… Backup - Home Assistant (2025.1 wizard, official blog) | Link |
| 5 | YouTube: Ultimate HA Backup Guide (Cloudflare R2, sizes) | Link |
| 6 | YouTube: Learn From My Mistakes (Retention, HA Cloud) | Link |
| 7 | Backup Integration - Home Assistant (Actions, official docs) | Link |
Conclusion
In conclusion, implementing a robust backup and disaster recovery strategy for your Home Assistant setup is crucial for maintaining data integrity and minimizing downtime. By following the 3-2-1 backup rule, prioritizing local solutions like NAS, and regularly testing your backups, you can ensure that your smart home remains resilient and secure.
For further insights into smart home privacy and security, explore our guides on Apple HomeKit Secure Video vs. Local NVR for Privacy, Aqara vs. Shelly vs. Tuya Privacy 2026, and Best Hardware for Local AI Smart Home 2026.